Saturday, November 19, 2016

Sliced Apple Pudding


After browsing for recipes for a cooking workshop, I came across this wonderfully easy recipe. Mary Randolph's Sliced Apple Pudding looked easy and tasty.

The Virginia Housewife, 1838
I started by peeling and slicing my apples- I chose two Granny Smith and Two Gala (maybe?)- they were what I had on hand from a mixed box. Next-six eggs- I had whisked them for around five minutes to get them "very light"- added two cups of whole milk. Adding flour is always a trail for me- I added one cup at a time, mixing the batter very well between, I ended up with four cups- it seemed to be the thickness of a cake batter. Adding a small cup of melted butter (around 1 1/2 sticks) mixing well. Then poured in the apple slices, mixing them in well. Four apples seemed to be just the right amount for this dish. I added some sugar, butter & nutmeg to the top.
Pudding before going into the oven. (I am such a messy cook!)
This recipe is large- so be prepared to use a very large dish (I ended up with a Pyrex mixing bowl). Into a 350* oven. It baked for around 40 minutes.  I found out when dishing it out that the middle had not set very well, longer in the oven, or a slightly  higher temp would have helped. Top each serving with some butter, sugar, and nutmeg as suggested. 


Hot Apple Pudding! 

The pudding was very good, the apples were still a little crisp as well. If you do not like a very sweet dessert this would be great for you since the only added sugar is on top. If you would like a sweeter pudding, add some sugar to the batter before adding the apples- a cup or so should be enough. Overall I do think that this will go in the index to try again! 

Wednesday, August 31, 2016

My Reenacting Journey

More than a decade ago I fell in love with this crazy hobby. I grew up with an appreciation for history and visited the historic sites in my great state. My mom jokes that I have always played dress up, just now it costs a lot more. Like many new reenactors I fell in love with the "Southern Belles" and romantic notions of days gone by.

My reenacting began with some family members. I had done a few local living histories before my first actual reenactment. We went to an event near the coast of NC in late April. This was the first event that I went to hat had Sutler attending, and I took advantage of their wares. I had already fallen victim to the "white shirt and calico shirt" outfit. That weekend I fell victim to THE SNOOD!!! Yes, I did have one, I paid $5 for it, it was brown and held all of my hair in it's rayon strings.
White shirt, crocheted shawl, calico skirt, and snood- oh my!! 

I continued my snooded, white shirt escapades for about another year. At one time there was even a matching paisley-print cotton fichu and skirt combo. What was I thinking? I didn't know any better. Soon, I would learn that there was a better way to do things, to portray them properly. I can remember searching the internet for reenactor how-to's and DIY projects. 

Then at an event I walked in a sutler tent and saw an edition of the Citizen's Companion on the table. It was their Women's clothing special edition, packed full of articles by the most experienced people in the field.  What to wear for underpinnings, dresses, head wear, etc. I still have that copy of the CC, cover falling off, but I have kept it. I remember sitting around camp that night looking through the pages, the photos, the CDVs, and thinking- I look nothing like these ladies. It was my turning point. I began looking for valid sources, not just reenactor pictures. I was led to one of my greatest resources, The Sewing Academy. I was a sewing novice! I really did teach myself how to sew historic clothing (my mom taught me how to sew & operate the sewing machine as a child). I made my first real dress, not just a skirt. I laid my white blouse out and traced it & make a bodice "pattern" and attached it to the skirt. I had an ill-fitting dress.  It was cheap green homespun- but it was a step in the right direction. 
Green homespun dress
I couldn't tell you what dress I made next. But I did make proper underpinnings & got rid of my petticoats that were made from bed skirts. I also ordered a corset. I had done it- I had began the process. I remember being at a small local event not long after I had made my new dress, I saw some of the best ladies in reenacting, and I avoided them like the plague! I had been so proud of my creation, but after seeing them I knew how far I had left to go. (Just a side note, one of these ladies is now my BF and author of Why Not Then.) I read almost every article I could, browsed all the patterns and pictures I could. I got a copy of "Who Wore What"  and read it cover to cover, again and again. I think my first real dress pattern was the Simplicity 4551, which is now out of print. (A few of my dresses are still made using this base!)  I made a few new dresses- and continued to learn about proper dress and material culture.

In one of my favorite work dresses. 
After I felt like  I was looking the part- trying more and more to match the styles of the original images I was seeing, I started attending better events. Going to events of a higher standard challenged me to grow more and more in my impression.  I began to think about everything from my hairstyle to the plate I ate out of. It was progression.

Quality events with quality participants can help challenge yourself. 

I still find myself thinking about all the details before an event. I also still look for ways to improve my impression and to improve my interpretation. I fell in love with cooking along the journey. I started small with the military group I was with. I would usually have a meal ready when they got back from the battle scenario- and it escalated from there- and now I'm here. I love sharing my learning experience with others and seeing the interest that spectators have when they ask questions about a piece of clothing or a recipe I'm preparing. It's always nice to know that I may teaching someone something!

Somehow, most of my interpretations involve food! 

The reenacting hobby has many facets and I am sure there are still plenty for me to explore. I strive to constantly improve my impression. I started in the Civil War and it is "main" impression (as well as part of my job) but I have also expanded my impressions and time periods. I have dabbled in early 19th Century- and now in 18th Century- but I approach them with the same way I approach Civil War Era. I have the advantage now of knowing where to find resources and patterns- and to start clothing from skin out. These are things that I, as an experienced reenactor, have learned the hard way. Luckily I learned my mistakes fairly early in my living history career and didn't waste a huge amount of money. I have to say that I am proud of how far I have come in my reenacting journey- although I know I can still go further- research more, study more, and sew more.  Which brings me to where I am today- researching more, studying more, and of course- sewing more!

Remember- there is always room to grow! 


Wednesday, June 22, 2016

The British Occupy Halifax

This past weekend I dove head first into the 18th century, again. This will probably become a recurring theme in the next few years.  This time we were in Historic Halifax, recreating the 1781 British occupation of the town. I portrayed a petty sutler again, this time selling penny loaves to the British soldiers. I only snagged a few photos, most of these are from the RRSpin


P and I in the British Camp selling bread


1725 Paul Sanby image of a Green Vegetable Seller. Part of my inspiration for my impression. I was so glad to that the photographer snapped the image above if my girl & I. 


Trying to sell produce and bread to the British. 

My sweet girl's first 18th C. event! 

P & her daddy on the town green in the morning. 

The British forces. 

Thursday, June 9, 2016

Menu Planning in the 19th Century: Easy Authentic Alternatives to Convenience Foods

Recently I was at an event, not as a participant- just as a spectator, when I saw it. It was coming across the yard near the campfire, a plate stacked high with bread. Mmmmm bread, sandwich bread, from a bag- a whole loaf, stacked on a plate, beside it being carried was a bag of potato chips. My heart sank. Why would you do this?
Then I remembered, that's why I started this blog. I wanted to show that what is eaten at an event can be just as important as the clothing and weaponry being used. Period food does take effort, but with small changes, anyone can do it.
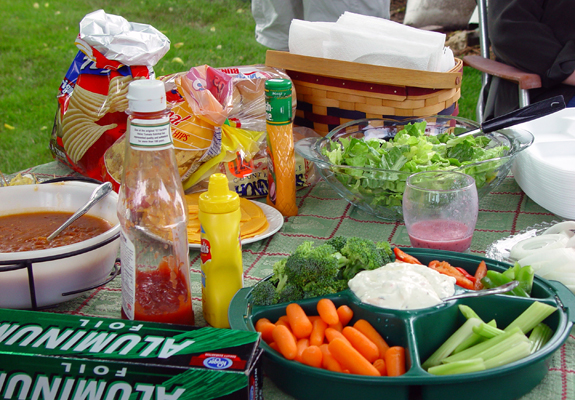
Picnic Table
The above photo is one of a standard summer picnic table, however, more than once, I have seen a very similar scene at living history events. Plastic ketchup bottles dotting tables surrounded by piles of hot dogs and potato chips, lunch meat packages and cheese wrappers. Why? The most common answer is usually convenience, others would say that it's hard to feed their kids period food (see this post). But even small changes in your food choices can make a big difference in your impression. Once you have a glaring yellow mustard bottle on your otherwise period correct table, what would you say to a visitor that walked up and inquired about your meal? "Oh, well, we just eat whatever we want."  Hmmm, there goes the credibility of any other good impression.


Heirloom Tomatoes at my local grocery. 
Simple period meals do not require much more than a trip to the grocery store. Take a walk through the produce section. What do you see? Chances are many of the items were available in the 19th century. Something as simple as potatoes & onions can provide a nice lunch verses modern hot dogs if you have a fire. Seasonal fruit (apples, berries, etc.) can be great snacks that do not even need to be cooked! (Which are great things to have around at those summer events.) What do all of these have in common? No cooler required either!

Loaves of bread ready for purchase. 
Moving along in the grocery store, we come to the bakery section. Stop, smell, smile. I do love bread, especially fresh bread. Many of us do not have time to bake bread at home for upcoming events, although, I do try, and you  may find it rewarding to try your hand at it as well. There are many alternatives to bags of sandwich bread. One, you can get bags of ready-made dough in the freezer section will cut down on prep time but still allow baking at home. Another option is to just buy the bread. Many stores offer a variety of fresh baked breads, or try a local bakery for a good loaf.

Let's keep moving. Meat. Honestly, you can go a day or two without it. If that is not an option there are alternatives to the bologna packages. I usually go with cured meats for a weekend- slab bacon, sausage, ham, etc. If I have fresh meat I cook it the first day and use leftovers for other recipes. (Such as using roast chicken in soup, or left over beef in a meat pie.) Meat does not have to be a main event of a meal- use it in soups or stews, use it as part of a ploughman's spread, etc. A great thing about the mid-19th century is that there are some canned meats available, such as corned beef. These canned meats do not require refrigeration and travel well.

Up next, dairy. I honestly do not think that I have served a meal at an event that did not involved dairy in some way. Milk, cream, butter, cheese, eggs. There are ways around it, but I prefer not to forgo my dairy. Buy cheese that can hold up for a weekend- Parmesan, cheddar, etc. If you have access to smaller stores you can get "hoop cheese" that is still sealed in wax and can last the weekend without being refrigerated. Butter can be kept in stoneware crocks with lids to keep it cool. Milk/cream can also be kept in crocks or stoneware jugs in a cool place (shady, or in a tub of water) if the weather is not too warm. There are also powered and shelf-stable milk options, I personally have never tried these, but have met reenactors that use them.

My spice tin stays stocked and ready. 
General groceries- the aisles that never end. Let's take a look at what can be used here. Dry beans. There really is no easier one-pot meal than beans, they hold up well and are great to eat no matter the weather.  Crackers, ditch the Ritz, go for "water crackers" they are readily available in most grocery stores and can be served with any meal- have them with cheese for lunch or serve with stew for dinner. They are also great to have on hand as part of a child friendly snack. Spices. These displays of plastic containers can be daunting- but keep a general spice tin stocked for events. Mine contains mace, mustard, cloves, allspice, cinnamon, ginger, and nutmeg. I keep salt in a separate container. Spices give even a drab pot of beans all the flavor they need! There are a few canned goods that can be used as well- peaches, evaporated milk, and I mentioned corned beef earlier- just be sure to change the labels out. Another great grocery item to have, especially at hot events- pickles! Grab a jar of pickles, transfer them to a crock and keep them readily available all day for crunching on and restoring electrolytes. Don't forget that the good staples are also found on these shelves- whole-wheat flour, sugar, cornmeal.

Well, that was a quick trip around the store. There are plenty of options to make great meals for a weekend with! Remember, if we make smarter decisions about the foods we bring, we are offering a better interpretation of the 19th century. There is always room for improvement.
A much improved lunch spread!

Tuesday, May 17, 2016

Fight for the Backcountry

On May 6, 1771, 2,000 backcountry farmers calling themselves Regulators stood in opposition against 1,000 militia under the command of Royal Governor William Tryon. The ensuing battle left several dead, scores wounded, and signaled a high water mark of the Regulator movement in North Carolina.
The site where this happened is now Alamance Battleground, an NC Historic Site. I was lucky enough to spend my weekend there, under the shade of the pines.
Thanks Taylor at Dames a aa Mode for the picture! 


My dear friend & I had done quiet a bit of research on vegetable sellers and went to sell our crop.  She was able to score a nice pack basket and I had a good friend make one to carry on my head.  ( As a side note, good 18th century baskets are hard to find.) DH was there as well, portraying the Vicar (but he really is one!) 
We spent most of our day near the militia camp, selling cabbages, radishes, and beets. Fresh produce is hard to acquire this time of year (although, radishes are coming out of the garden now.) 
It was a nice laid back weekend that I really enjoyed. There was a battle scenario both days, DH served on one of the cannon crews during the Sunday Battle "defending his flock" as he said. 


Petty Sutlers
"Get yir cabbages!"
Sunday's lunch. 
Tryon's Militia forming before battle. 
Sunday's battle, DH serving on the gun crew. 


The weekend served as a perfect, formal introduction into the 18th century. It was nice to get to spend quality time with old friends, and make new ones. 
Thanks to the hard work put in by the staff at Alamance, I'm already looking forward to next year.